SL Clothes Creation: The Basics

This guide is a quick introduction providing an overview of the basics when starting to make clothes and starting your fashion store in Second Life.
Avatar UV Template
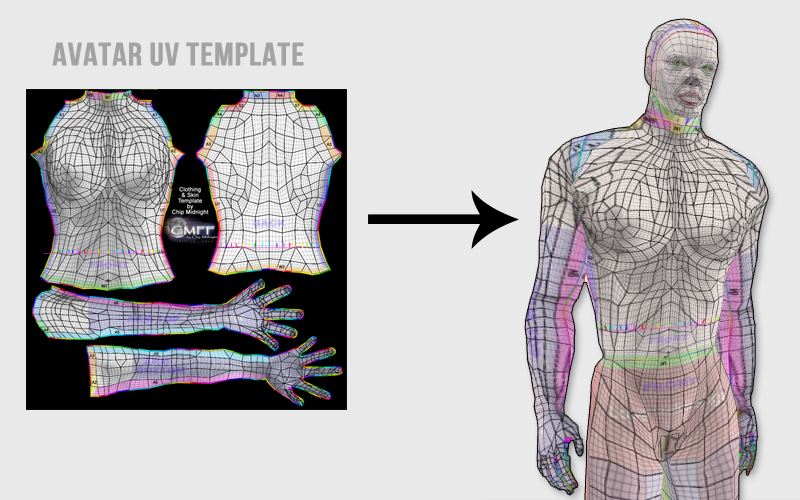
The avatar UV template is one of the most essential tools for clothes creators that you’ll be using all the time. It is basically a “map” showing where the flat texture is going to projected onto the avatar when worn, so when using the UV map, imagine the 2D clothing texture being wrapped around the 3D avatar. There are three parts of the Avatar UV Template, the Upper, Lower and Head.
Here are links to two versions of the Avatar UV Map:
Chip Midnight Avatar UV Templates
Robin Sojourner Avatar UV Templates
Clothing Templates
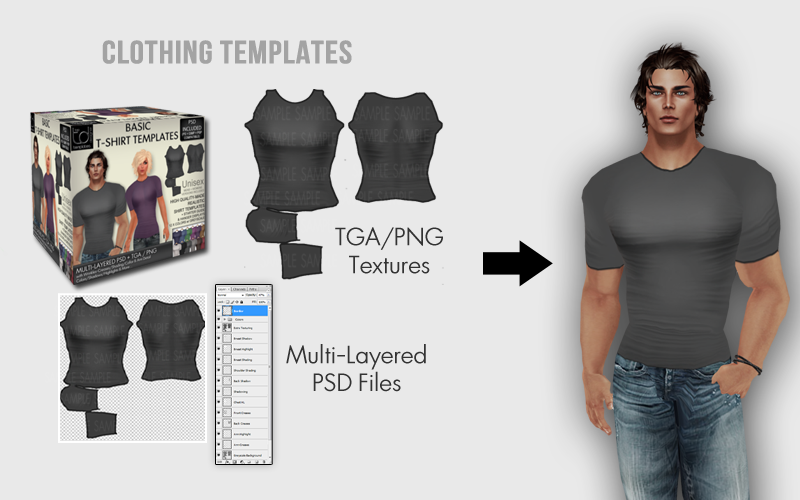
A quick way to start learning the different elements that construct an outfit is to use a clothing template. Clothing templates are ready-made designs, great for observing what a clothing texture consists of to make up that particular outfit. They often also come with PSD files which are particularly useful for learning since they can contain the different components of the clothing on separate layers such as the shading/creases/buttons etc.
Templates also make a good starting point for designers to begin building confidence by modifying them with their own creative touches before making an outfit completely from scratch.
Which Graphics Program to choose?
Depending on your level of expertise you will need a graphics program to make and modify your creations. There are three popular graphics programs that are widely used in clothes creations in SL. These being GIMP, Paintshop Pro and Photoshop.
GIMP – This is a free program available for download. Gimp will open TGA, PNG and PSD files. There are some limitations when opening PSD files, should the PSD file have groups, special effects or advanced blending modes, GIMP will not support those features. Great for beginners as it is free and relatively easy to use.
You can download GIMP for free here
Paintshop Pro – Compatible with Windows, this is a more advanced graphics program which provides the necessary requirements for clothes creation in SL and is cheaper than Photoshop.
A trial is available here: http://paintshoppro.com/
Adobe Photoshop – Considered a standard in the graphics design industry, Photoshop is compatible with both Windows and Mac and gives you a wide variety of tools ready for you to use when designing SL clothing.
A trial is available here: http://www.adobe.com/go/tryphotoshopextended
Here is a link to a comparison page between Paintshop Pro and Photoshop
http://paintshoppro.info/tutorials/paintshoppro_vs_photoshop.htm
Using a “Fake Bake”
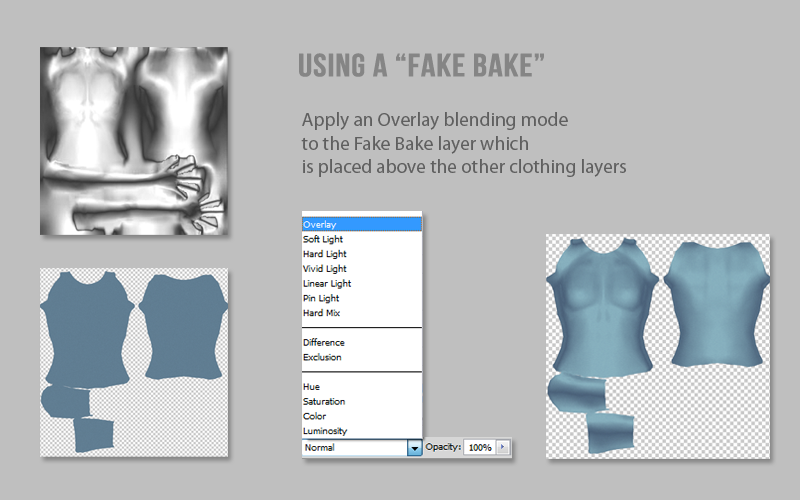
A fake bake is an image which displays the contour shading of the avatar. Overlaying it onto your clothing texture is an easy way to add depth and simulating a more “3d look” with shadows and highlights as opposed to a flat plain colored surface.
Download the fake bake images from here (scroll down the linked page for the male/female fake bakes)
You can place the fake bake image on a new layer on top of your clothing texture and apply an overlay blending mode to blend the fake bake shading in with your outfit like so:
(The blending modes drop down menu is usually located above the layer list next to the opacity slider)
Studying the shading on the fake bake is a good place to start learning about how shading is applied to SL clothing, you can use it as a reference when begn drawing your own shading to know where the shadowing and highlights should be positioned on the avatar.
Using the brush tool to draw a basic wrinkle in PS
You can apply the same steps in other programs but the tools /effects might have different names and be located in different menus.
Creases are essentially a combination of shadows and highlights. However, it is the positioning of these shadows and highlights that gives your outfit the required depth to make it look realistic.
– Create a new canvas with the size 512×512.
– Fill the canvas background with grey (Color Code #c1c1c1) using the paint bucket tool.
– Make a new Layer
– Set the Foreground Color box to White.
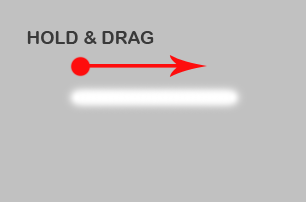
– Choose your Brush Tool from the toolbox and select a soft edge brush with size 22.
– Hold Shift and drag your mouse to draw a straight line.
– Now go to your layer list, right click the layer and duplicate it.
– From the top toolbar menu click Image > Adjustments > Invert (Shortcut Key – Ctrl + I, Command + I for Mac)
– This will change the duplicated line from white to black.
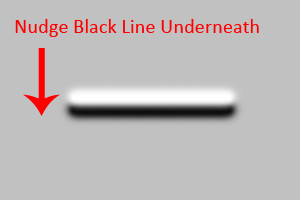
– Then click and drag this layer down in your layer list so it is underneath the first one.
– Next we’re going to Nudge this layer downwards using the down arrow key. Holding Shift while tapping the arrow keys performs a further nudge. In this example I used one further nudge and three normal nudges.
– Merge these two layers together by holding Ctrl (Cmd for Mac) and selecting them both in the layer list, then right click and choose Merge Layers.
– Apply a Gaussian Blur by selecting Filter > Blur > Gaussian Blur from the top toolbar menu. We’re going to set the Gaussian Blur to 3.5
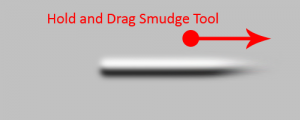
– Use the Smudge Tool to smudge the edge of the crease outwards.
– Repeat for the other side.
– Now if we were to place this crease as it is now onto an outfit as it is, it would not blend in correctly – you would just see a black and white line on top. Set the blending mode to Overlay and it’ll blend in on top of your outfit. The blending modes drop down box is above the layer list next to the opacity slider. Experiment with different blending modes such as Multiply and Soft Light to achieve the best result.
Importing / Exporting Textures to/from SL
To bring the designs into SL that you have made in your graphics program, you will need to upload them to SL which has a fee of $10L per upload.
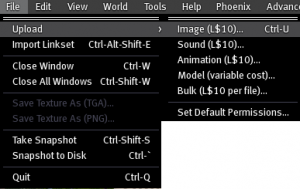
1. Click File from the top toolbar then select Upload > Image
2. Navigate to the hard drive location of the texture you want to import.
3. Select your texture then click Open.
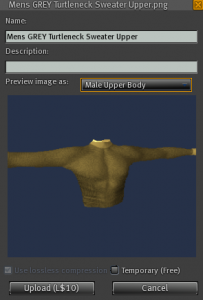
4. A preview window will appear allowing you to view your texture before you upload it. You can also select from the Preview Image As: drop down box to view what the clothing will approximately look like on an avatar.
Using the Preview Window
Before clicking ok to upload, notice there is an option under description to Preview Texture As. Click the drop down box and select the body section your texture applies to.
This window can be used to preview what your texture will look like on a default avatar shape. It is useful or testing what it will look like before paying to upload the texture and trying it on your avatar.
-Controls-
Hold the left mouse button and move the mouse up/ down to zoom in and out.
Hold Ctrl Key and use the mouse to Rotate around the avatar preview.
Hold Ctrl + Shift Key and use the mouse to change the position of the preview camera.
5. Once you click Upload, the image will be present in your textures folder located in your inventory.
Tip: You can temporarily upload textures without charge by using a third party viewer such as the Phoenix Viewer which allows free temporarily uploading. This will save you L
$’s in upload fees when trying on your designs in-world. However, since they are being temporally uploaded, ensure to fully upload them before packaging your clothing up to sell to customers. Link to the Phoenix Viewer here: http://www.phoenixviewer.com/
If you wish to save one of the clothing textures from your inventory to your hard drive, you will need to export it from SL.
1. Open the texture in SL by double clicking it in your inventory. The texture has to have full permissions in order to export it to your hard drive.
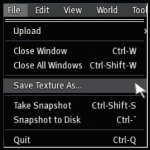
2. Click File from the top toolbar.
3. Select Save Texture As…
4. Choose a location on your hard drive to save the texture to.
5. Click Save.
Your texture will now be saved to your hard drive ready to be opened in your graphics program.
What are TGA/PNG files?
TGA file – (Targa File) File format commonly used in SL as it can contains alpha channel information. The alpha channel is a mask, this is used to cut out the shape of the outfit when making clothing textures, it controls which parts of the texture are visible when imported into SL.
PNG files are bit-mapped images which use the transparent parts of the texture to determine which parts are cut out. For instance the image you see on the screen with its transparent background will appear just as it is on our screen when imported back to SL as a PNG file.
What is an Alpha Channel?
The alpha channel is usually located in the channels palette window next to layer list ot will normally be the black and white channel found below the RGB channels.
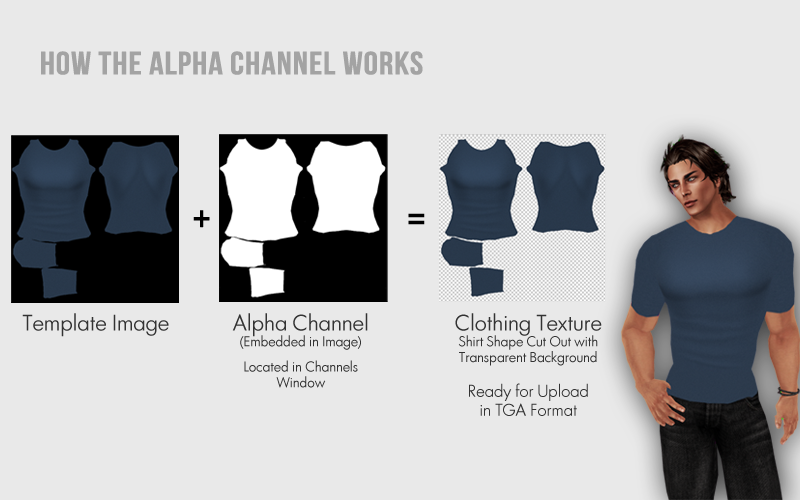
The alpha channel controls what parts of the image will remain visible once it is saved in a particular file format that supports the alpha channel eg. TGA. In simple terms, the white parts of the alpha channel will be visible, the black parts will be transparent.
Why does this relate to clothes making? Well, think about the alpha channel as the cut-out shape of the clothing.
If you take a look at the alpha channel on the left of this picture, you’ll see that it outlines the shape of the shirt on the right. The white parts are visible whereas the black parts of the alpha will be cut out and you’ll be able to see what’s underneath. In other words, with alpha channels – we can create the shape of our clothing.
Alpha Channels have a number of applications such as setting the length of a sleeve, shaping a collar or even making an open shirt by taking out the middle section. Alpha Channels are key to clothes creation in SL.
From Texture to Clothing – Creating Clothes in Appearance
Once you have your clothing texture ready, the next step is to turn the texture into an actual clothing item which can be worn by your avatar. You create the clothing item in the appearance menu, this menu is accessed in different ways on various viewers according to whether they use the Viewer 2+ User Interface or not.
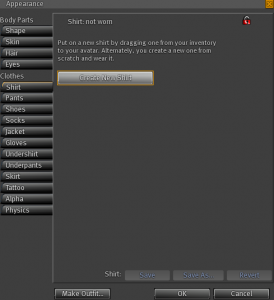
(Pre-Viewer 2 UI)
In this example we’re going to go through the steps to create a shirt in appearance.
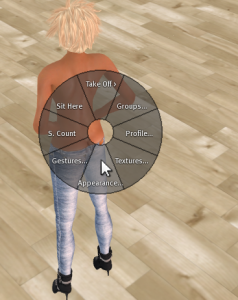
1. Right Click your Avatar to bring up the pie menu.
2. Select Appearance
3. Click the Shirt Tab then Create New Shirt.
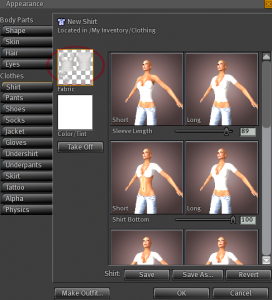
4. Drag the Clothing Texture from the your inventory into the Fabric Box.
5. You can use the sliders in the appearance menu to adjust settings such as shirt length etc.
6. Click Save As
7. Rename the New Clothing Item that you’ve just made by right clicking it in your inventory (it will be at the top of the clothing folder) and selecting rename.
(Viewer 2+)
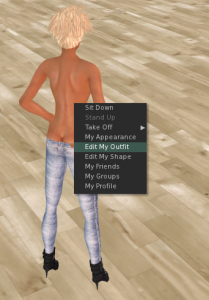
1. Right Click your Avatar
2. Select Edit My Outfit
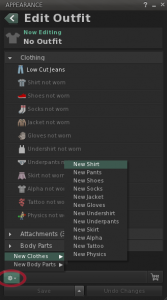
3. Click the Cog Icon at the bottom of the Edit Outfit Menu and choose New Clothes > New Shirt.
4. Drag the Clothing Texture from the your inventory into the Fabric Box.
5. You can use the sliders in the appearance menu to adjust settings such as shirt length etc.
6. Click Save As and enter a name the clothing item.
7. The clothing item will now be at the top of the clothing folder in your inventory.
Product Properties & Permissions
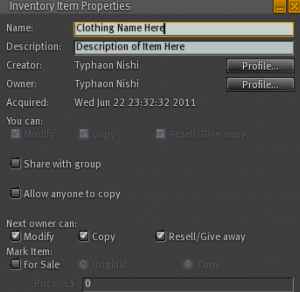
To view properties go to your inventory, right click the clothing item and click properties. From here, you can see properties such as owner/creator/permissions and more.
Modify – They will be able to modify the item, when relating to clothing they can go into appearance and modify the clothing attributes such as looseness and sleeve length.
Copy – The customer will be able to copy the item in their inventory.
Transfer – The customer will be able to transfer the product to someone else (if its no copy they lose the item if they transfer it to someone else)
Taking Pictures of Your Product
In order to sell your product you will need to take some pictures to be able to show customers what your product looks like. You might like to set yourself up a little photo studio area if you have some land or perhaps just set up an area where you can place a backboard to take pictures in front of. SL provides the facility for you to take pictures by clicking on the “take snapshot” button at the bottom of your screen.
There are many model poses available if you would like a more professional style pose, there are also many freebie poses available in world and on SL Marketplace to help you get a good pose for your picture. You can be your own model if you wish or perhaps get a friend to model your outfit. The aim here is to get the best possible picture for your product. This can be make or break as far as selling an item. Even the most fantastic outfit can be a non seller because the product picture is not showing the outfit to its best. Be sure to take clear and reasonably up close pictures.
Its good practice to get a front and back view of your product. Take the picture up close to show as much detail as possible on your outfit. Again, take a look at the display pictures of other similar products on SL marketplace to get an idea of how to present your clothing. If you wish to improve your photo taking skills in SL there are many tutorials on taking “high resolution” photos in SL. These can be found on the SL website and on YouTube. The better your product picture is, the better chances you have of customers wanting to buy your product.
Here is a link to a photography tutorial by Strawberry Singh which guides you through how to get great looking pictures in SL:
http://strawberrysingh.com/2010/04/12/tutorial-taking-high-res-blog-snapshots-for-intermediate-users/
Creating the Display Board
Now you have boxed up the product items into a package, you can now create a product board from which you are going to be selling the product from. Create a new prim, re-size it, then place the product display texture onto the front of it. Now you can drag the product package into the display board and set it for sale. To set it for sale, go into the general tab by right clicking and selecting “edit” from the pie menu. At the bottom of this window you will see the option to set the item for sale. Tick this box then enter in the desired price you want to sell the item for. You will also want to select the contents option below the price box so that the product board gives whatever is inside its contents to the customer when they buy from the board. On the bottom left side of the window you’ll see a drop-down box under where it says “When left clicked”, this tells the object what to do when its left clicked, select Buy. The difference between “Pay” and “Buy” is that the pay option is normally used when the product board communicates with a vending script inside whereas buy is used when setting up a basic vendor prim without any scripts necessary and also displays what is inside the box contents before the customer purchases the product.
Steps to opening your store
This is a great time to talk about what kind of theme you will have for your shop. A good idea is to have a look at what is for sale on the SL Marketplace. If you open your SL Account and go to Marketplace you will be taken to the online SL Marketplace. This online store is where merchants can put their items up for sale. Click on Apparel and take a look at some of the items that other merchants are selling. You can click on “visit the store” link and it will then take you to all the items that that merchant has for sale on the marketplace. Most merchants have an In-World store, this is a virtual store that customers can walk around and view your items, you can decorate your store and set it out like a real life store, have specials, give away a gift to your customers who visit the store, etc.
Think about what kind of clothing you wish to sell in your store. Some merchants just have a general clothing store and sell a wide range of clothes whilst others like to have a themed shop. You may want to sell street clothes, formal clothes, costumes, leather wear, gothic, etc.
Let’s assume that you have now made your clothes, packaged them and would like to start selling your product. As mentioned before there are two marketing areas in SL, you can own or rent a virtual store and/ or sell your items on SL Marketplace.
How Do You Rent or Own a Store In SL?
There are many land owners in SL that will rent you space on their property to open your store. You will need to take a good look around the virtual malls and commercial sims (a sim is a virtual piece of land or island) to see what is available. Well established and successful merchants will usually have a whole sim dedicated to their store. They may also have many “satellite” stores as well, meaning lots of smaller stores on different sims, in malls, clubs, etc. It can be hard choosing where to put your store. As a new creator a good place to have your store may be in an established commercial sim. You will see thousands of these commercial sims all over SL. You can look in the classifieds on the SL website or inworld to see where empty stores are already set up and ready to rent.
Be wise when choosing where to open your store, if you are selling beachwear for instance, try and rent a shop or stall in a beach themed area. You will then be selling your product in an area where people who are most likely wanting your style of clothes. When you are on the hunt for a good rental space, how many other shops are there and what they are selling. Will your style of clothes be of interest in that area? Also take note of how many people are walking around and shopping in that area. If there are a lot of people shopping in that area then you have more chance of them wandering into your store to see what you have for sale. Look at the location and size of the store you are looking at renting. How many items do you have to sell?, will you need a big store or just a small stall? You may want to start off with a smallish size store and move to a bigger store later as you expand your business. A small store or stall is good to start off with neatly set out product boards and some “visuals” such as a giveaway inside your store.
As you will see in SL there are thousands of places you can rent to sell your items. Do you homework first by spending time looking for the best location for your store. A good bit of research first could be the key to whether you sell your items or not. Factor in the cost of the rental well. A small shop with about 30 prims will cost you anything from 0 – 300L. Keep in mind each of your product boards will be at least one prim. If the rent is particularly high look around the area to see why?, is there a lot of people shopping on that sim? The amount of visitors to the sim is called “traffic”. So the landlord may charge quite high rent because the demand for available rentals there is high.
If the mall is new or has many shops available the rent may be quite low, although this is more affordable, there may not be a lot of visitors to that area and then selling your product may be harder to do. If you do decide to rent an area – pay for it week by week at first and see whether you are getting sales and how many people are visiting your store.
You can put in a traffic monitor (available on SL Marketplace – usually around 100L) this will give you a daily report to your emails on how many people are visiting your store and how long they are staying in your store, all this kind of information helps you to establish how well your store in that location is doing. Some mall areas will even let you occupy a store in their mall for free but will ask to take a commission from each sale you have. This can be ideal for new creators who don’t want to spend money on renting. A script is put into each of your product boards, this script will instruct the item to send a percentage of the sale of your item back to the mall owner. Usually the mall owner will take around 30%. Don’t be afraid to message the person who owns the shop for rent to check if they work on a commission basis. Sometimes it pays to ask questions.
Classifieds
Classifieds are a good way to advertise your store to potential customers. Classifieds are paid listings that residents can search in, the highest paid classifieds are displayed first. However, if you have a set of relative and unique keywords that are specific to your store, the more chance of it coming up in search when residents are searching these terms.
To place a classified, go into your profile, then click the “Classified” tab.
Click “New”, enter in the details and set the location that residents will be taken to when they click to teleport from the classified. Also, set the rating of the classified to either PG or Mature depending on your store content. Now click “Publish” and it will ask you what price to set the classified at. Once you’ve confirmed the price it will be entered into the classified listings.
Guide to Selling on SL Marketplace
Once you have your product ready and packaged up, you’re now ready to sell it on SL Marketplace.
SL Marketplace is a website run by Linden Labs that allows residents to put their merchandise up for sale via the internet. Residents can then sell their items via the marketplace direct to the other residents. Only SL residents can buy or sell on SL Marketplace. You can access SL Marketplace either by clicking on Shopping in your account on the SL website or by going to https://marketplace.secondlife.com. Once you put an item up for sale there you will become a merchant. Customers can browse the marketplace to look for items to buy and have them delivered to them in-world.
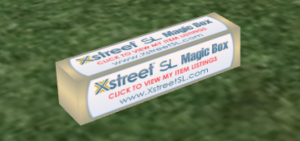
In order to begin listing products on SL Marketplace you will need a magic box and a place in-world to place it. A magic box stores all of the items you’re going to be selling on SL Marketplace. When a customer purchases an item on the Marketplace, it gets sent from the magic box contents to their avatar.
Here is the link to get a magic box for your items:
https://marketplace.secondlife.com/p/Xstreet-SL-Magic-Box/36791
Place the magic box on your home sim or somewhere that it will be kept permanently. If you don’t have your own land you can search the classifieds for “magic box”, there are rental places especially designed for placing your magic box.
Although it is possible to move a magic box from sim to sim, this will cause a disturbance in the communication between the website and in-world leading to temporary failed transactions/failed deliveries. Also, it may require you to reset the location of your magic box on the marketplace website.
Listing Your Products on SL Marketplace
Now that you have placed your magic box down on a piece of land, right click the magic box, go to edit then click the contents tab. Drag your product box from your inventory window into the magic box contents. The magic box will turn blue and start the process of communicating with the website, once it has stopped flashing and turned back to its original colour, this means you are ready to start setting up the product on the marketplace website.
Log into the marketplace website – https://marketplace.secondlife.com
It is advisable to read the Marketplace Fee and Listing Policies before placing your item on the SL Marketplace. To view this go to the SL website, log into your account, go to “Terms of Service” at the bottom of the page and click on “Marketplace Fee and Listing Policies
At the top of the page next to where your avatar name is, click “My Marketplace” then “Merchant Home” On the left side of the screen, click “Manage Inventory”.
Now click “Sync Marketplace with Magic Boxes”, this will synchronise your items from the magic box to the website ready for selection.
Once you’ve clicked Refresh on your web browser the item will show up on the inventory list. Click “Create”.
The product listing details page will appear allowing you to enter in the details for your product. Here you can input the item title, product features, description and more.
The keywords box is important since these are the words which when searched for on the website, will bring up your product listing. Make these words relative and specific to your product to improve the likelihood of your product appearing in search.
The SLurl box is for entering in the SLurl location of your store if you have one. Go here to build a SLurl to link to your store location http://slurl.com/build.php
Another important part of the listing process is the listing enhancements which also increase awareness of your product listing.
Feature this item on the home page will show your listing on the front of the marketplace website for a duration of time.
Feature this item on a category listing page will show your listing in a row on the top of a specified category whilst customers are browsing.
Feature this item on the checkout receipt page will show your item listing when SL Marketplace customers visit the checkout part of the website during purchases.
Feature this item on the L$0 cart checkout ads page will show your item listing when customers who purchase $0 worth of items visit the checkout during purchases.
Note: Also, ensure that the button next to active at the top is checked to enable the product to be listed.
Once you’ve completed this page click update and you’re product will be listed on SL Marketplace ready for residents to purchase!
Note: SL Marketplace has a page regarding its listing guidelines available here:
https://marketplace.secondlife.com/listing_guidelines
———————————————————————————-
Thank you for reading this tutorial.
TD Templates is an established template creation store with 500+ templates.
Please Visit our Store for Clothing Templates, Sculpties, Resource Kits, Tutorials and More…
Store SLurl here


